
Everything you need to connect, protect forms and clean email data.
N-Software Email Validator is a free WordPress plugin that uses your Email Validator API account to check email addresses in registrations, checkout, comments, forms, bulk files and stored site data.
Use this guide to install the plugin, add your API key, choose which integrations to enable, understand validation results and troubleshoot common issues.
Quick links
What this guide covers
- Plugin installation and free API account setup.
- Settings, API connection and supported form integrations.
- Validation statuses and blocking behavior.
- Bulk Validate, Logs, Debug Test and Email Health.
- Users status column and stored email review.
- Privacy, cleanup on uninstall and troubleshooting.

Use one account across the plugin, API and bulk tools.
The plugin has no separate paid license. Your free Email Validator account supplies the API key and the same 200 free monthly credits can be used with your connected workflow.
Install the plugin and connect your free API key.
The plugin sends addresses to Email Validator only after you add and save an API key. Use an administrator account during setup.
1. Install the plugin
- Download N-Software Email Validator v1.3.26.
- In WordPress go to Plugins → Add New → Upload Plugin.
- Select the ZIP file and click Install Now.
- Activate the plugin.
- Open N-Software Email Validator → Settings.
2. Create and connect an API key
- Create a free account at email-validaton.com .
- Confirm your email to unlock the free allowance and API access.
- Copy your API key from your account.
- Paste it into the plugin Settings screen.
- Save settings and wait for the green API Connected indicator.

Recommended first settings
- Keep the default timeout for normal website forms.
- Use caching to avoid checking the same email repeatedly.
- Enable only the integrations used by your site.
- Start with invalid and disposable blocking; review risky and unknown results before using stricter policies.
- Use Quick Validate or Debug Test after connecting the API.
If API Connected does not turn green
- Check that the API key was copied completely, without extra spaces.
- Confirm the email account has been verified.
- Confirm the server can make outbound HTTPS connections.
- Try Quick Validate or Debug Test with a test address.
- Check the Logs screen for the response or error detail.
Choose where validation runs and how each result is handled.
Each available integration is controlled from Settings. Enable only the form types you actually use so validation remains predictable and easy to manage.
WordPress core
- User registration.
- Comments.
Commerce
- WooCommerce checkout.
- Stored customer email review through Email Health.
Forms & newsletters
- Contact Form 7.
- WPForms.
- Gravity Forms.
- Ninja Forms.
- Fluent Forms.
- Formidable Forms.
- Forminator.
- MC4WP, WS Forms and Mailster forms.
Validation statuses and plugin behavior
| Status | Meaning | Default plugin action |
|---|---|---|
| valid | Mailbox confirmed by available signals. | Allowed. |
| invalid | Mailbox or delivery route is definitively rejected. | Blocked. |
| disposable | Temporary or throwaway provider. | Blocked. |
| risky | Result is not sufficiently certain for a firm answer. | Allowed. |
| catch_all | Domain accepts many recipient addresses. | Allowed. |
| over_quota | Mailbox is reported as full. | Allowed. |
| unknown | No definitive validation answer was available. | Allowed. |
| rate_limited | Temporary API capacity or rate limit response. | Allowed. |
| error | A completed check returned a technical error state. | Blocked by default. |
Fail-open when the API is unreachable
If the API is temporarily unavailable because of a network timeout or service reachability issue, the plugin lets the form submit. This prevents a temporary external problem from blocking registrations, leads or orders.
A completed API response with a status is different from a network failure. Review Logs and Debug Test when you need to see exactly what happened.
Optional business-domain rule
Enable the optional free consumer provider block when you only want business-domain addresses. This can restrict providers such as Gmail, Yahoo, Outlook and similar consumer services.
Use this only for B2B workflows. Do not enable it on consumer-facing sites unless you intentionally want to reject personal addresses.
Validate a file, inspect the logs and review emails already stored on your site.
The plugin includes operational tools beyond real-time form protection: Bulk Validate for uploaded lists, Logs and Debug Test for diagnostics, Email Health for stored records, and email status visibility in the Users list.

Bulk Validate
- Open N-Software Email Validator → Bulk Validate.
- Upload a CSV or TXT file with one email address per line.
- Use up to 5,000 addresses per upload.
- Start validation and follow the live progress display.
- Review totals including valid, invalid, risky, catch-all and other statuses.
- Download the CSV result file when the job finishes.
For larger standalone list-cleaning work, use the Email Validator web platform and its bulk workflow.
Logs and Debug Test
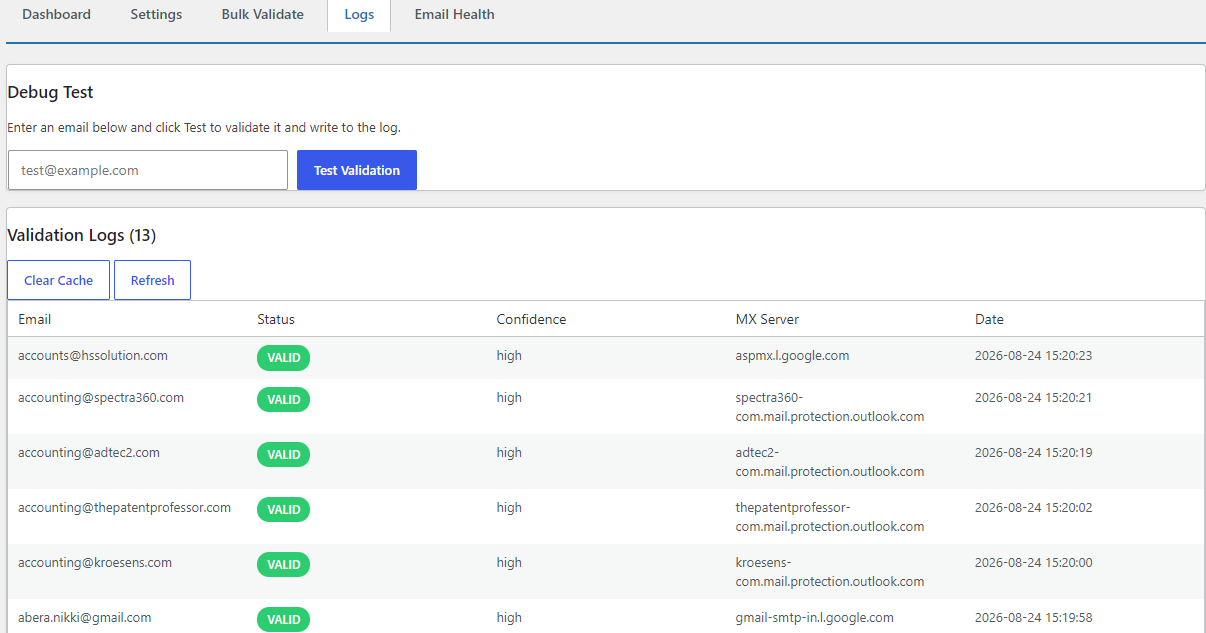
Logs show recent validation history and help you understand what the API returned. Depending on the result, entries can include status, confidence, MX signal and source such as a live form, dashboard check or Email Health scan.
Use the Debug Test panel when diagnosing one address. It is intended to show the returned data clearly so you can differentiate a real validation outcome from configuration or network trouble.

Email Health
Email Health checks addresses already stored on your WordPress site, not only new submissions.
- Scan WordPress users, WooCommerce customers and comments.
- Pause and continue scans while progress is stored.
- Review results before taking any cleanup action.
- Delete or anonymize selected addresses where appropriate.
- Process large lists in server-side batches.
Important: export or back up data before deleting or anonymizing records. A validation result is useful information, but it does not replace your normal backup policy.
Users list email status
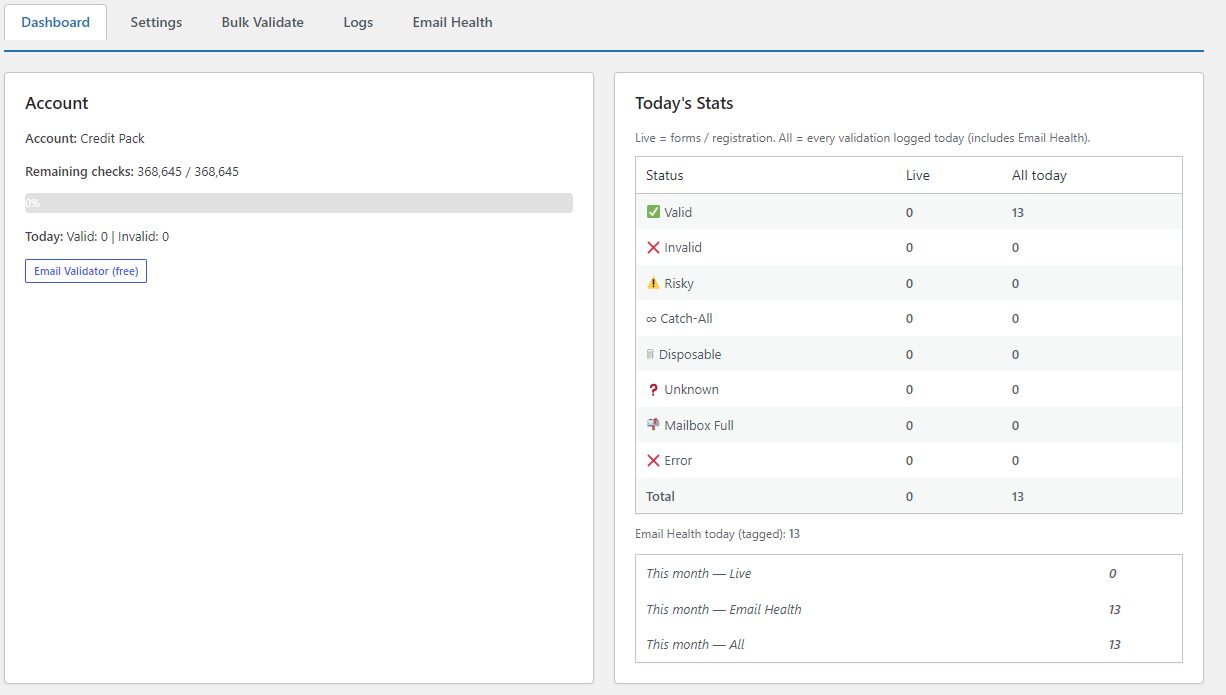
After an address has been checked, the WordPress Users → All Users view can display an Email Status column. This gives administrators a quick way to see whether an account address is valid, invalid, risky, catch-all or another result.
Understand what is sent to the API and control local plugin cleanup.
The plugin does not perform mailbox validation entirely inside WordPress. When a validation runs, it sends the email address and your API key to the Email Validator API so the service can return a result.
What the plugin can store locally
- Plugin configuration and integration settings.
- Cached validation results, based on your configured cache TTL.
- Validation logs and diagnostics.
- Stored email status information for relevant users.
- Email Health scan progress and operational records.
What is sent during a check
- The email address being validated.
- Your API key for authentication and credit tracking.
- Normal technical request context needed to process the request.
Nothing is sent until you save an API key and a validation action actually occurs.

Remove all plugin data when the plugin is deleted
Version 1.3.26 includes an optional cleanup setting. By default, settings and historical plugin data can remain available after deactivation or deletion, which helps if you reinstall the plugin later.
Before permanently deleting the plugin, enable Remove all plugin data when the plugin is deleted only if you want a full cleanup of plugin settings, cached results, logs and plugin-created data.
This action cannot be undone. Export data and confirm your normal WordPress/database backup is available before deleting the plugin.
Before deleting or anonymizing email records
Use Email Health cleanup carefully. Validation results help identify unusable or risky addresses, but they do not decide your legal retention obligations, order history requirements or customer-support needs. Keep backups and review your business and privacy requirements before destructive actions.
Troubleshoot the connection, forms and validation behavior.
Start with the API connection indicator and Logs. Most setup issues come from an unconfirmed account, copied API key error, outbound HTTPS restriction, an integration not enabled in Settings, or a result policy that is stricter than intended.
Re-copy the API key without spaces, confirm the account email is verified, check outbound HTTPS access from the WordPress server, and use Debug Test or Logs to see the returned response. Confirm that your server is not blocking requests to email-validaton.com.
Open Settings and verify that the relevant integration is enabled. Confirm the form actually uses an email field supported by the integration. Submit a test with a clearly invalid address and then inspect Logs to confirm whether the form hook was reached.
Those statuses are intentionally allowed by default because they are not definitive proof that a real user should be rejected. The plugin is designed to block clearly invalid and disposable addresses while avoiding unnecessary lost leads or checkout failures.
The plugin uses fail-open behavior for temporary reachability and network failures. This protects your registration, lead and checkout flow from an external service interruption. Review Logs and server connectivity if the problem continues.
Confirm the file is CSV or TXT, contains one email address per line and has no more than 5,000 addresses. Check that credits are available and review Logs for the actual error. Large operations can take time depending on server conditions and recipient domains.
Developers can point the plugin to another compatible API base URL through the north_ev_api_base_url filter. Use this only when you understand the security, privacy and behavior implications of changing the API destination.
Technical support
Use the support channel for installation help, API configuration, form integrations, bulk validation, logs, Email Health, bugs and product questions.
What to include in a support request
- Plugin version, currently 1.3.26.
- WordPress and PHP version.
- Which integration or screen is affected.
- What you expected and what happened.
- A non-sensitive screenshot or relevant log message.
- Whether a test address was checked through Quick Validate or a live form.
Ready to protect your WordPress forms?
Download the free plugin, create your API account and connect the integrations you already use.